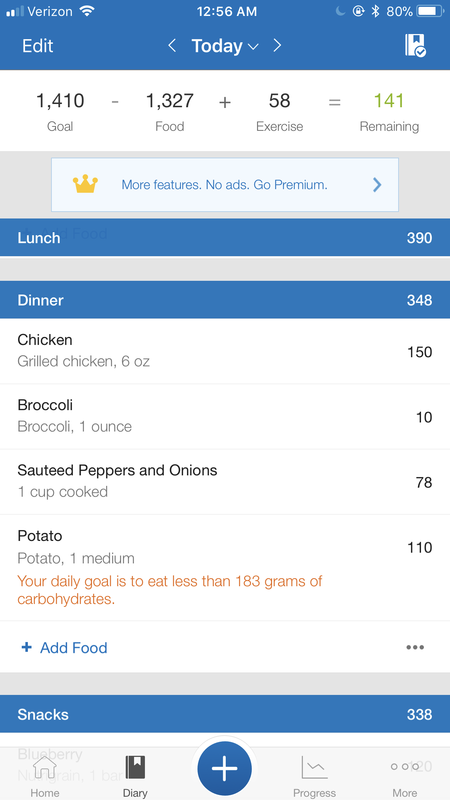
 Helllloo fitness fam!! I'm going to kick-start your week by sharing some apps that I use to help me with my health and fitness. There are so many different apps you can use to help you with your fitness, whether it's counting your calories, finding healthy recipes, or recording your exercises. Incorporating some health apps into your daily lives will help you make your fitness journey so much easier!! I don't even remember what I did before I started using the apps I am about to share with you. The first app I am going to share with you is called MyFitnessPal  This app is sponsored by Under Armour, and it offers such great things....for FREE! On this app, you are able to create your own account in which you share your current weight, and what your target weight is. It will ask you a bunch of questions to see what your daily fitness life is like. It'll ask you how active you are on a daily basis, when you want to lose the weight by, and what your diet is like. After all the questions are asked, the app will tell you how much you need to loose each week in order to reach your target weight, as well as how many calories you can eat each day. It's pretty amazing. On this app, you will find a section called "Diary". In this, you are able to count your calories each day. This app makes it so simple for you to do that. It breaks down each meal into breakfast, lunch, dinner, snacks, and dessert. There is also a section for water, and for exercise as well. After each meal is eaten, all you have to do is click on "Add Food", and you can search the exact food you ate! For example, say I hate an egg for breakfast, and a slice of toast. All I would need to do is type in "egg" in the search bar, and click on the option after the search is up. After each food is clicked on, it will show you how many calories you have eaten total, and how many you have left remaining for the day.
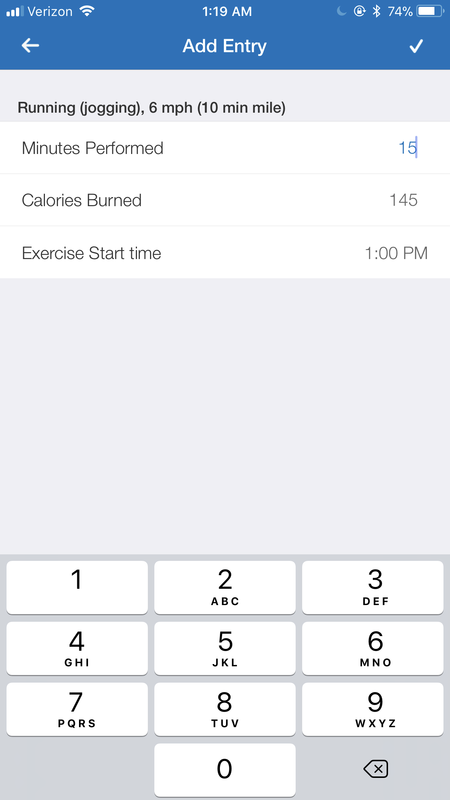
Another cool option is to enter the type of exercise you did that day. There are so many options that show you how many calories you burned. All you have to do is click on the type of activity or exercise you did, and for how many minutes. The app will tell you how many calories you burned, and deduct it from your total calories of the day. So say I ran on the treadmill for 15 minutes at 6mph.... I would click on the first option, then type in 15 under "minutes performed".
Then, it would show you that I burned 145 calories from this exercise. At the top where it says "calories remaining", 145 is listed on top of exercise. This shows that I burned 145 calories from running, and now I have even more calories remaining for that day. 
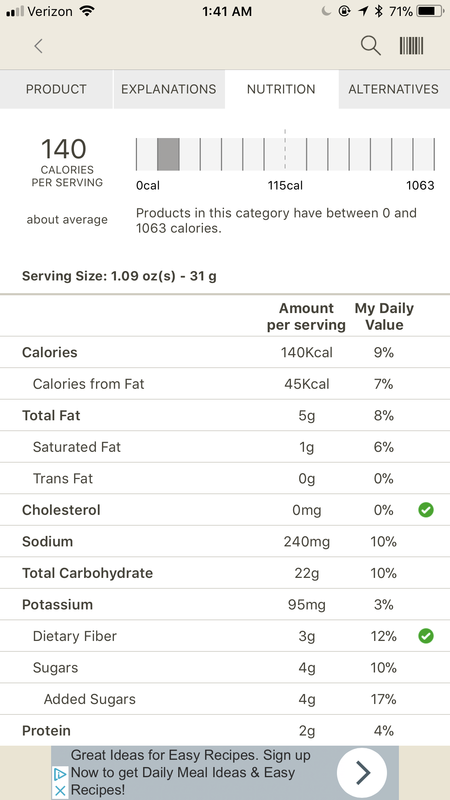
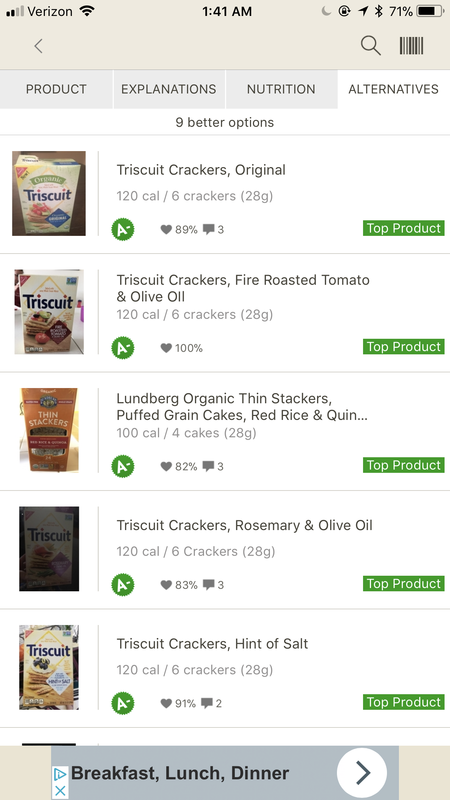
These are just a few features I love about this app. I definitely recommend downloading this app to help you along your fitness journey and to see results better! It only takes a few seconds out of your day to type in what you ate for each meal and what your exercises were, and this app makes it even easier to do these things! The next app I want to share with you all is called Fooducate.  I can say that this app has honestly saved my life. I use it almost every single day. This app offers many different features as well, but I only use one of the features. This app is also a calorie counter, but I use myfitnesspal to count my calories. You may use whichever you'd like...they both do the same thing!!! The feature that I use on this app is called "Food Finder". This feature is A M A Z I N G.  What this feature does search for different foods you eat on a daily basis, and give you a grade on the food based on the nutritional facts. What's even cooler is you can scan bar codes on food items!!! If you ever see me in the grocery store, you might think I'm crazy because all I do is pick up food, scan it, and either place it in my cart or put it back on the shelf. This app amazes me.  By scanning the barcode or searching the specific food, this app also offers a whole section on nutrition where you can see all the nutritional facts. It also offers a whole section on alternatives, where you can see other foods that are similar and may be better for you.
This app also offers other things like healthy recipes, diet tidbits, and ways you can get involved with you community! Both of these apps are amazing!!! I definitely recommend you download them and add them into your daily routine. They will only help you see results faster, and will make your fitness journey easier! I know they have made my life so much easier! 
1 Comment
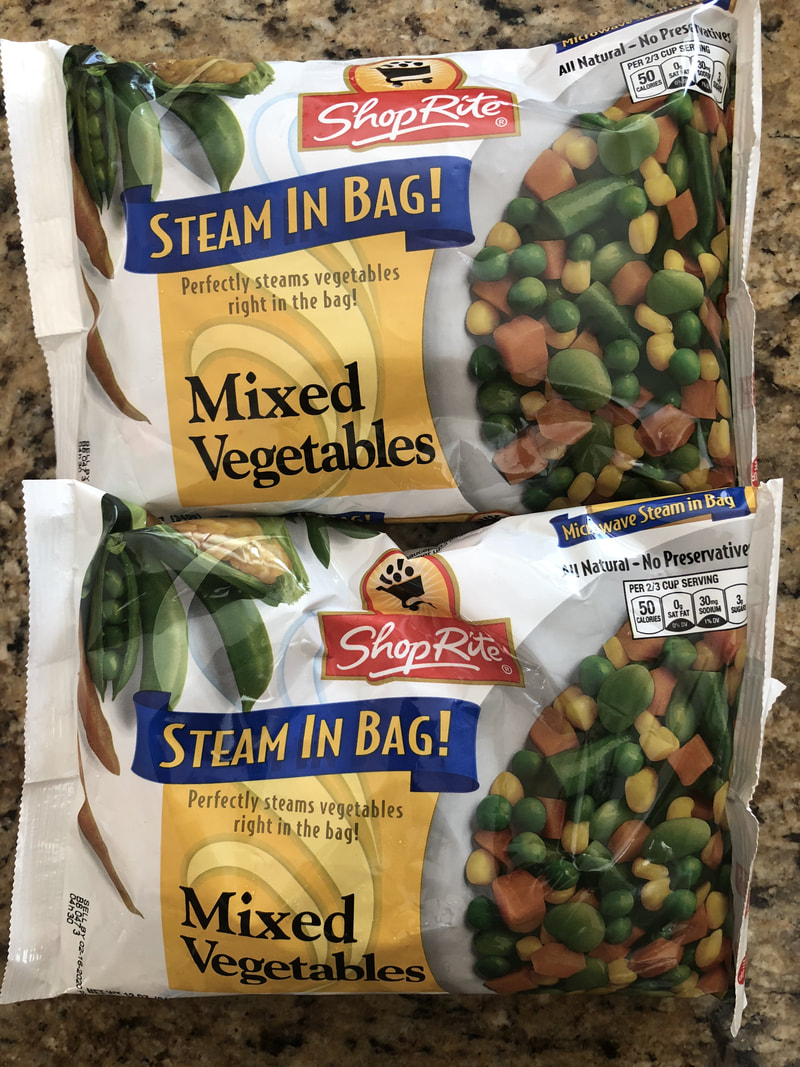
Week days are HARD and BUSY. You have class all day long, then straight to the library. You'll be lucky if you even make it to the gym. You get home...and all you want to do is EAT, SHOWER, then SLEEP. How frustrating is it when you get home, to realize you have NOTHING to eat? I know, frustrating, right? It happens to me all the time. Then, you have to drive to Wawa and walk in looking like a monster who just got out the shower. Not a pretty sight to see. It was about a year and a half ago where I discovered what meal prepping was! And I can honestly say it has SAVED my life, or at least made my busy schedule at school a little easier. Meal Prepping is so fun. Especially if you are good at cooking (which I am not). And the best part: Anyone can do it! It just takes up about 20-30 minutes of your day to prepare all the food, but it is WORTH IT!!!! There are so many different things you can do with meal prepping. If you look up on the internet, "Meal Prep ideas", so many different recipes show up. Now, this is something you are able to do for the rest of your life. As you get older, maybe you'll make more gourmet foods. But, since we are at college and balling on a budget, I'm going to show you how I meal prep. So easy and so simple, I promise you will never want to go back to the "What do I eat for dinner tonight?" phase. Who's ready to meal prep like a champ?  SO... 1. Before even starting, you need to think about what you want to make for your meal prep. Meal preps can be made for 4-5 days of the week. I usually do 4, because Friday, Saturday, and Sunday are used for whatever I want. I tend to eat out more on the weekends and found that Monday-Thursday is the perfect amount, as I used to waste my 5th meal prep on Friday. You need to think about what you can eat, and what you want to eat. Your meals should consist of some type of protein (chicken, steak, beef, etc), some type of vegetable, and some source of grain. For my meal prep, I love making grilled chicken, mixed vegetables, and potatoes. It's super simple, and most of it is found in the frozen section. All you need is a microwave...it's that simple. 2. Once you decide what you want to make for your 4 days, you should write down everything you need in order to make those meals on a grocery shopping list. There's nothing worse than finally coming home after a tiring visit to the grocery store, to find that your missing something really important. Try to avoid this from happening. You need to make sure you have containers for your 4 days as well!! Once you write down everything you need, it's time to go. Go to your favorite grocery store, and check off every item as you place it in your cart. For this post, I am going to show you all what I buy and make for my meal preps. I bought everything that I will list below for under $15!!!!! Without meal prepping, $15 would get me one dinner during the week, not 4.
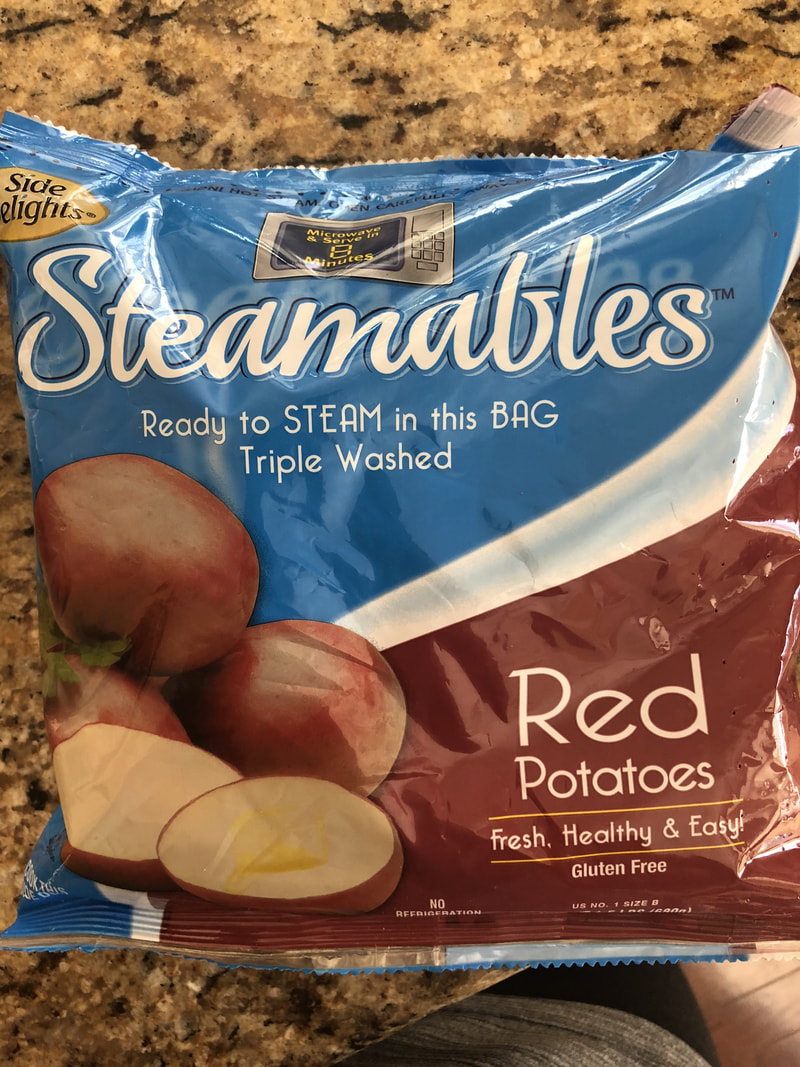
 What I to get is chicken, potatoes, and mixed vegetables. I used to get a bag of potatoes that I would peel, cut, and boil myself. I found something else that saves a lot of time, much easier, and tastes the exact same. In the section where the fresh vegetables are, there is a little part where the potatoes are found. Within that section, there is a blue and red bag that says "Steamables" This thing is AMAZING. All you have to do is pop it in the microwave for 8 minutes, and it's done. I highly recommend this if you are going to add potatoes to your meal prep. I also get mixed vegetables in the frozen section. If you're at Shoprite, the frozen food section has a WHOLE aisle dedicated to frozen vegetables. You can pick whatever you would like. I like the mixed vegetables because there is a little bit of everything in it, and it's delicious too. Lastly, I get chicken breast in the meat section. You can get any brand you want. I recommend chicken breast, as this is easiest to cook and marinate for your meal prep. I usually only need 2 breast for the 4 days.
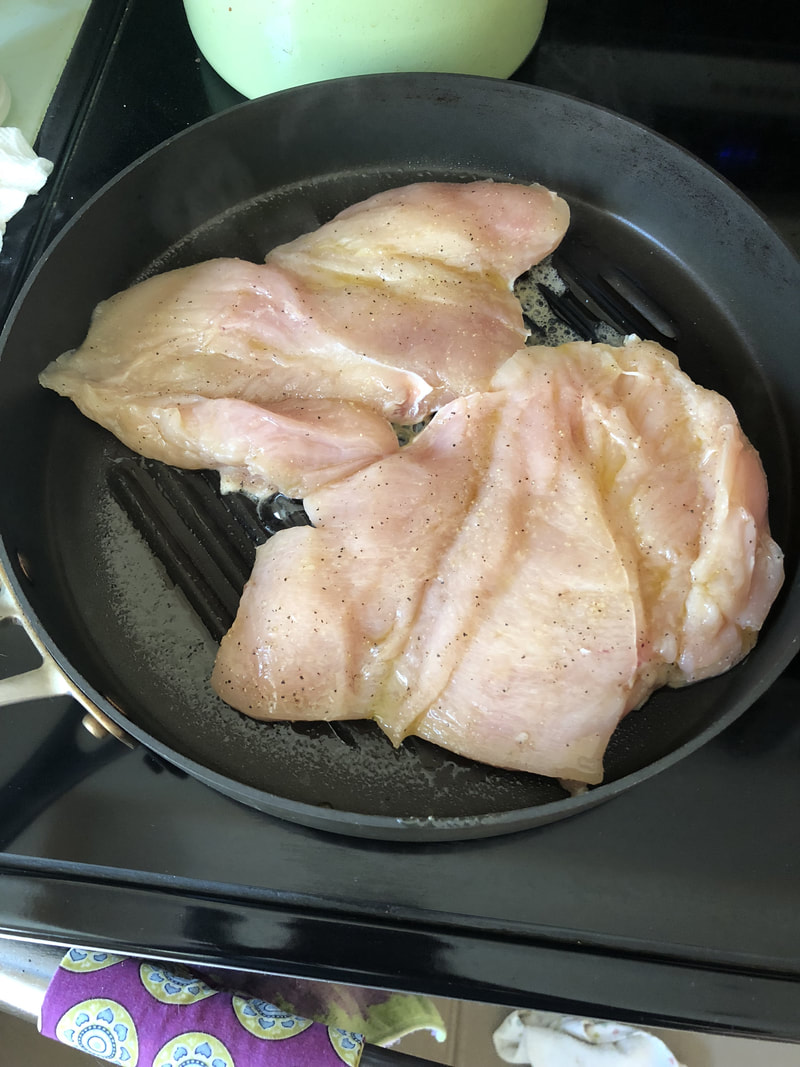
Once you double check your grocery list, and check out, you're good to go!!! Time to meal prep like a CHAMP! 3. So, before even doing anything, you should lay out your 4 containers on a counter like this. This helps keep everything organized, and it's easier once you start cooking, 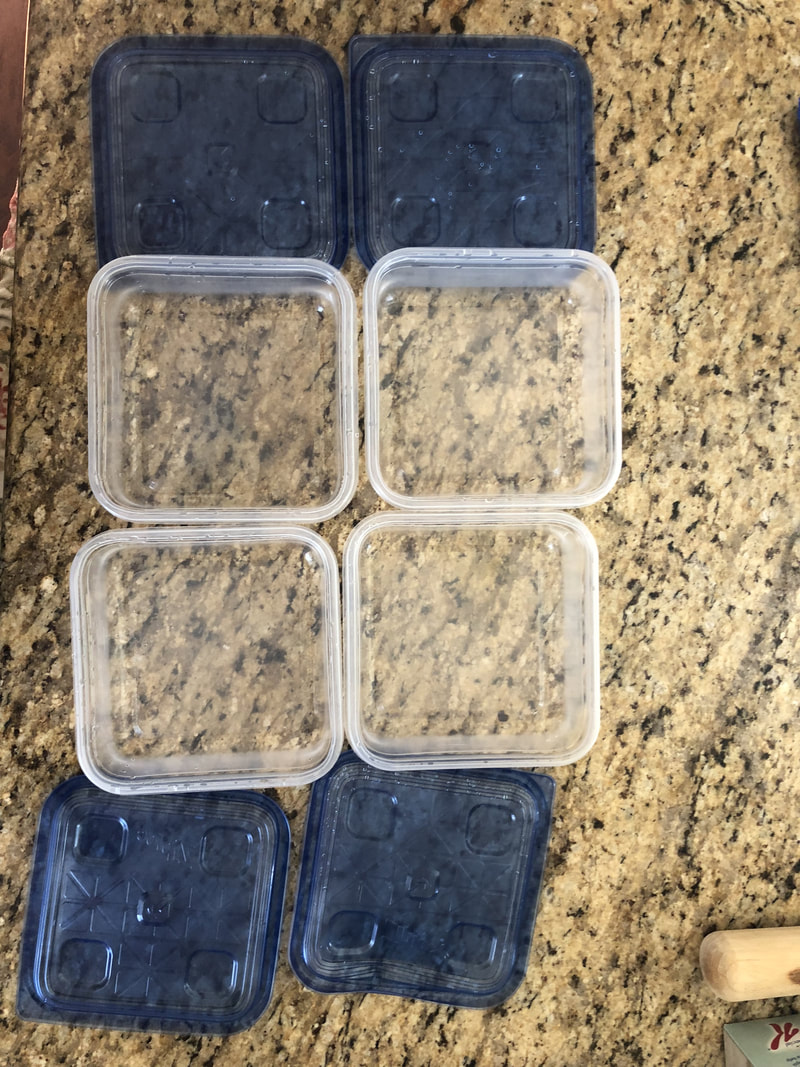 4. After you lay out your containers, you can begin marinating and preparing your grilled chicken. This is probably the hardest part of the whole meal prep. I like to "butterfly" cut my chicken, and make it one big, even, and flat piece of chicken. This allows it to cook better and faster, and more evenly. After you cut the chicken breasts into even pieces, you can cut off any pieces of fat you notice. After, you can start marinating. For grilled chicken, all I do is sprinkle some salt, pepper, and garlic powder on both the front and back of all the chicken pieces. Then, I put olive oil all over just enough to coat the whole chicken. If you wanted more flavor, you could totally add different dressings or sauces. You could do a barbecue sauce, Italian dressing, or even a teriyaki marinate. Once your chicken is marinated, it's time to cook. I usually spray my pan with cooking oil to prevent sticking or burning. After that, I put my stove on medium-high. I place the chicken on the pan, and cover it with a lid. I tend to do the front covered with the lid for about 4-5 minutes, then I will flip the chicken over and do the other side for another 4-5 minutes. I like my chicken crispy, so I'll leave it on for more time after it's already cooked on low. When you have achieved your perfect chicken, you can turn off your stove and let your chicken sit while you do the rest of your meal prep.
It's time to move on to the rest of your meal prep!!  5. The next step is to cook the vegetables of your choice. For me, I usually cook the mixed greens (pictured above). To cook this, you just place the bag facing up in the microwave for about 4 and a half minutes. After it's done cooking, let it sit for a minute, as it is HOT. Don't burn yourself like I did my first time. Once it's ready, I like to cut a little tiny hole at the bottom corner to drain the excess water. Then, I cut the top corner off, and split one bag into two containers. You can use one bag for all four containers, but if you love your veggies like me, I recommend using two bags. If that's the case, then pop the other bag into the microwave and repeat the same steps as before. 6. It's now time to move onto the final part (YAY!!). One step closer to becoming a meal prep champ. So next, is cooking the potatoes. If you are using the Steamables bag like I am, all you have to do is place the bag in the microwave face up for about 8 and half minutes. Simple as that. 7. Once your potatoes are done cooking, wait a minute or two to let them cool off. Once you let them cool off for a bit, place them on a cutting board. I like to cut the potatoes into fourths to make sure there is enough to fit evenly in all four containers. **make sure the potatoes are cool enough before you cut them or else they will be too soft and will break into smaller pieces!!  8. Once you cut your potatoes, place them into your four containers! 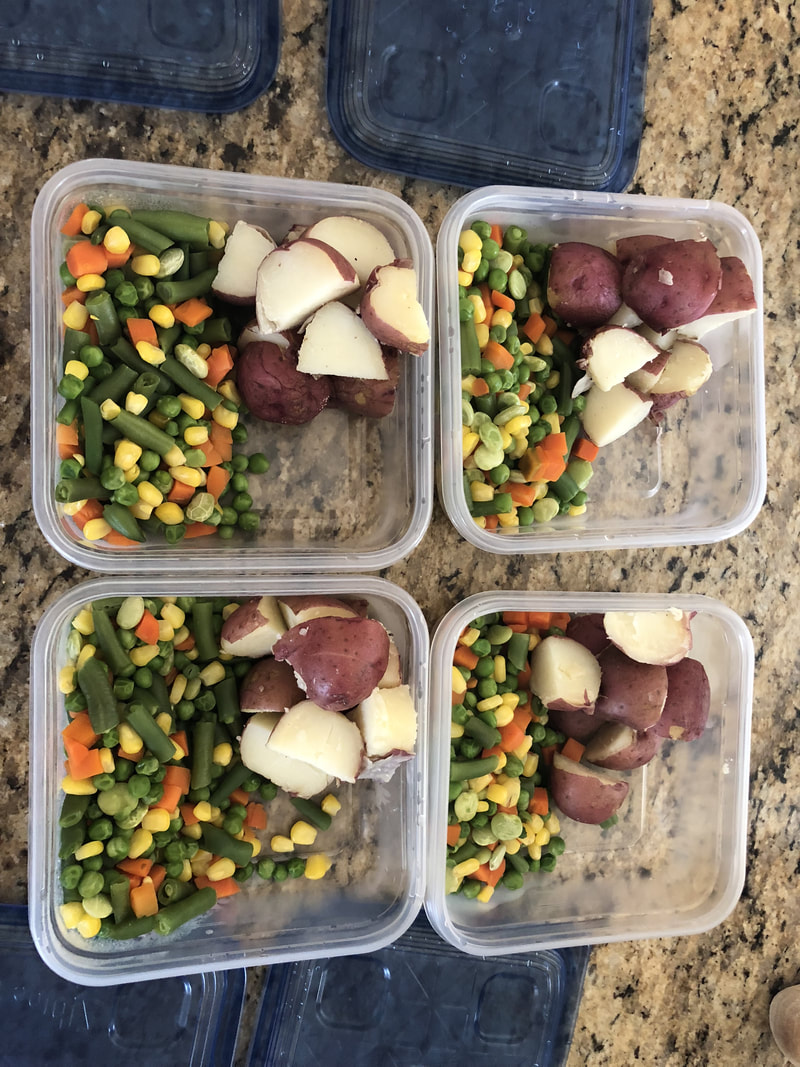 9. The last and final step is to take your chicken our of the pan, and place them on a cutting board. You can cut your chicken however you like. I like to cut them into small strips so that they are bite size and I won't have to cut them later on in the week when I eat them. Once you cut your chicken, you can place them into the four containers evenly.
And that's it!!! Meal prepping will help make your busy lives that much easier. Your weeks will not consist of deciding what to eat for dinner, when your answer is in your fridge! If you have more free time to prep, feel free to make even more meal preps for lunch or even breakfast. There is so much you can do with meal prepping! The creativity is all up to you. Check out some other meal prep recipes! 1. Chicken Spring Roll Jars 2.Honey Sriracha Glazed Meatballs 3. Sesame Chicken Pasta Salad 4. Smokey Green Bean Turkey Skillet 5. Spicy Peanut Chicken Wrap ***Find out more healthy and easy meal prepping recipes at Greatist!!! Follow these easy steps to become a meal prep champ, and you will NOT regret it!  Helllllllo fitness fam!!! RU ready for this post?    FINALS. The dreaded week of every semester. Things get pretty stressful during this week. All the final papers, projects, presentations, and exams. Pulling all-nighters just so you can get through the end of the semester. This is the week you may go crazy. I don't know about you, but I know one way for me to deal with my stress is EATING. And no, not necessarily healthy food. I'll eat anything around me to help me cope with my stress. Whether it's goldfish, chocolate, pretzels. Literally A N Y T H I N G. You begin writing your paper, crack open a new bag of chips, to realize at the end that they're all GONE. Now, this may not be the best thing for your body, especially for this whole week of finals. Lack of sleep, poor appetite, and no time for the gym. You don't want your body to shut down. SO.... What I want to share with you are some ways you can prevent and avoid bad stress eating. I am going to share some tips with you on how to prepare yourself for the dreaded finals week here at Rowan University, and stock up on healthy foods so that your body will THANK YOU! I'm also going to share some places you can eat if you're on the move and need a quick little lib break. And to make it even better, I am going to share how to do all of this WHILE SAVING MONEY! So, let's get started! For all you study break peeps who need a quick bite to eat: If you have a meal plan...use your MEAL SWIPES! These do not carry over to the next semester. Better to get rid of them sooner than later. Here are some places you can use your swipes in order to eat healthy for your quick library break.
2.) Boro/ Rowan Bucks You can use Boro at places like :
Using your card at Shoprite is the most useful thing you can get out of your bucks, I personally think. You can eat and buy stuff wisely from here. If you want to stock up on healthy foods to help your stress eating when your up late at night studying, keep reading.
 You can view my Niche Blog Commentary here!
|
AuthorWelcome all you fitness finatics!! I hope you enjoy my blog. Subscribe to my page to read about healthy recipes, different workouts, and much more! ArchivesCategories |


 RSS Feed
